|
|
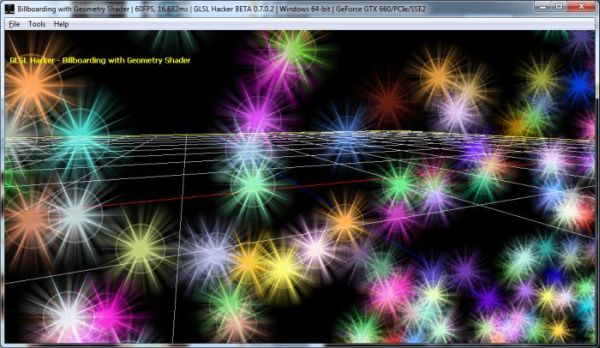
We learnt what the le billboarding is and how to implement it in the vertex shader, we can now look at another technique to achieve billboarding, particularly well suited for particle rendering.
Usually, particles are points (a 3D position per particle) and the rendering of a textured particle requires a point to quad transformation. Point sprites are a nice solution for particle rendering. But, if you want a better control of the quad (the position of the four corners, texture coordinates, clipping/frustum culling, etc.) we need a way to reproduce what the point sprite built-in feature does in the GPU. |
Geometry shaders are a powerful way to reproduce point sprite functionality. Geometry shaders allow to create new geometry on the fly and this is exactly what we want: create four vertices (a quad) from one vertex (a particle). And this particular amplification task (1:4) is so important that Radeon GPUs have a special hardware support for that case:
…and similarly since the geometry shader is expected to be commonly used for replacing point sprites (by expanding point primitives to a triangle strip with two triangles) there is also special hardware for taking care of the 1:4 case.
Source: Radeon HD 2000 Programming Guide (page 9)
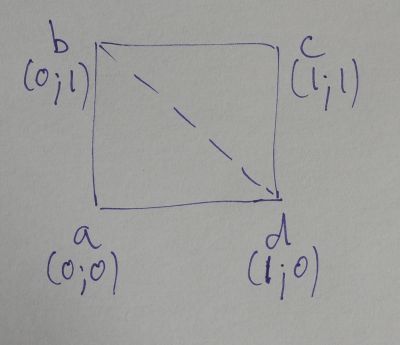
So, the main task of our geometry shader is to transform an incoming vertex (that vertex comes from the vertex shader) into four vertices (a, b, c, d) that will shape the particle quad:
Once again (see this article about billboarding), we are going to use the ModelView matrix. But this time, we are going to extract values from this matrix to billboard the quad instead of modifying the matrix.
What are those key values? Those values are two vectors that define the camera plane. Both vectors, right and up, are extracted from the inverse of the ModelView matrix. With a regular model-view matrix (which is an orthogonal matrix), the inverse is equal to its transposed: columns and lines are reflected along the main diagonal of the matrix.
The ModelView matrix:
And the inverse (or transposed in our case):
![]()
right and up vectors are built like this:
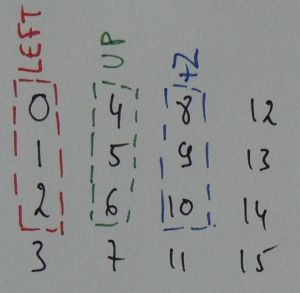
right.x = ModelView[0][0]  // 0
right.y = ModelView[1][0]  // 4
right.z = ModelView[2][0]  // 8

up.x = ModelView[0][1]  // 1
up.y = ModelView[1][1]  // 5
up.z = ModelView[2][1]  // 9
Now that we have two vectors that define the camera plane, we can create a quad that always faces the camera by transforming a point (with a position P that belongs to any plane parallel to the camera plane) into a quad (with a size of size) doing this:
vec3 a = P - (right + up) * size;
vec3 b = P - (right - up) * size;
vec3 d = P + (right - up) * size;
vec3 c = P + (right + up) * size;
Et voilà, we have our billboarded quad!
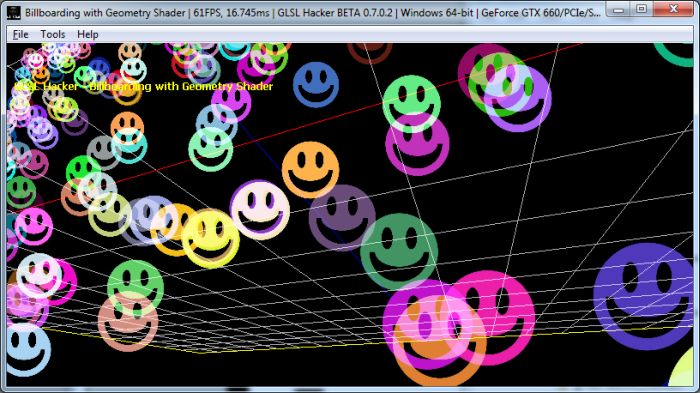
Ok, the tough work is done, here is the fully GLSL program of billboarding as it is used in the GLSL Hacker demo that comes with this article:
Vertex shader
#version 150
in vec4 gxl3d_Position;
in vec4 gxl3d_Color;

// GLSL Hacker automatic uniforms:
uniform mat4 gxl3d_ModelMatrix;

out Vertex
{
  vec4 color;
} vertex;

void main()
{
  gl_Position = gxl3d_ModelMatrix * gxl3d_Position;
  vertex.color = gxl3d_Color;
}
Geometry shader
#version 150

layout (points) in;
layout (triangle_strip) out;
layout (max_vertices = 4) out;

// GLSL Hacker automatic uniforms:
uniform mat4 gxl3d_ViewProjectionMatrix;
uniform mat4 gxl3d_ModelViewMatrix;

uniform float size; // Particle size

in Vertex
{
  vec4 color;
} vertex[];


out vec2 Vertex_UV;
out vec4 Vertex_Color;

void main (void)
{
  mat4 MV = gxl3d_ModelViewMatrix;

  vec3 right = vec3(MV[0][0],
                    MV[1][0],
                    MV[2][0]);

  vec3 up = vec3(MV[0][1],
                 MV[1][1],
                 MV[2][1]);

  vec3 P = gl_in[0].gl_Position.xyz;

  mat4 VP = gxl3d_ViewProjectionMatrix;

  vec3 va = P - (right + up) * size;
  gl_Position = VP * vec4(va, 1.0);
  Vertex_UV = vec2(0.0, 0.0);
  Vertex_Color = vertex[0].color;
  EmitVertex();

  vec3 vb = P - (right - up) * size;
  gl_Position = VP * vec4(vb, 1.0);
  Vertex_UV = vec2(0.0, 1.0);
  Vertex_Color = vertex[0].color;
  EmitVertex();

  vec3 vd = P + (right - up) * size;
  gl_Position = VP * vec4(vd, 1.0);
  Vertex_UV = vec2(1.0, 0.0);
  Vertex_Color = vertex[0].color;
  EmitVertex();

  vec3 vc = P + (right + up) * size;
  gl_Position = VP * vec4(vc, 1.0);
  Vertex_UV = vec2(1.0, 1.0);
  Vertex_Color = vertex[0].color;
  EmitVertex();

  EndPrimitive();
}
Fragment shader
#version 150
uniform sampler2D tex0;
in vec2 Vertex_UV;
in vec4 Vertex_Color;
out vec4 FragColor;
void main (void)
{
  vec2 uv = Vertex_UV.xy;
  uv.y *= -1.0;
  vec3 t = texture(tex0,uv).rgb;
  FragColor = vec4(t, 1.0) * Vertex_Color;
}
We can make the geometry shader a little bit simpler by working directly in the camera view space. The vertex position in the vertex shader is now multiplied by the model-view matrix instead of the model matrix and in the geometry shader, we simply expand the point into a quad in view space. Since we are in the view space, we just need to translate the vertex using simple 2d vectors. After what, each new vertex position (va, vb, vc and vd) is multiplied by the projection matrix. There is no longer need to compute the right and up vectors:
Vertex shader
#version 150
in vec4 gxl3d_Position;
in vec4 gxl3d_Color;

// GLSL Hacker automatic uniforms:
uniform mat4 gxl3d_ModelViewMatrix;

out Vertex
{
  vec4 color;
} vertex;

void main()
{
  gl_Position = gxl3d_ModelViewMatrix * gxl3d_Position;
  vertex.color = gxl3d_Color;
}
Geometry shader
#version 150

layout (points) in;
layout (triangle_strip) out;
layout (max_vertices = 4) out;

// GLSL Hacker automatic uniforms:
uniform mat4 gxl3d_ProjectionMatrix;

uniform float particle_size;

in Vertex
{
  vec4 color;
} vertex[];


out vec2 Vertex_UV;
out vec4 Vertex_Color;

void main (void)
{
  vec4 P = gl_in[0].gl_Position;

  // a: left-bottom
  vec2 va = P.xy + vec2(-0.5, -0.5) * particle_size;
  gl_Position = gxl3d_ProjectionMatrix * vec4(va, P.zw);
  Vertex_UV = vec2(0.0, 0.0);
  Vertex_Color = vertex[0].color;
  EmitVertex();

  // b: left-top
  vec2 vb = P.xy + vec2(-0.5, 0.5) * particle_size;
  gl_Position = gxl3d_ProjectionMatrix * vec4(vb, P.zw);
  Vertex_UV = vec2(0.0, 1.0);
  Vertex_Color = vertex[0].color;
  EmitVertex();

  // d: right-bottom
  vec2 vd = P.xy + vec2(0.5, -0.5) * particle_size;
  gl_Position = gxl3d_ProjectionMatrix * vec4(vd, P.zw);
  Vertex_UV = vec2(1.0, 0.0);
  Vertex_Color = vertex[0].color;
  EmitVertex();

  // c: right-top
  vec2 vc = P.xy + vec2(0.5, 0.5) * particle_size;
  gl_Position = gxl3d_ProjectionMatrix * vec4(vc, P.zw);
  Vertex_UV = vec2(1.0, 1.0);
  Vertex_Color = vertex[0].color;
  EmitVertex();

  EndPrimitive();
}
Fragment shader
#version 150
uniform sampler2D tex0;
in vec2 Vertex_UV;
in vec4 Vertex_Color;
out vec4 FragColor;
void main (void)
{
  vec2 uv = Vertex_UV.xy;
  uv.y *= -1.0;
  vec3 t = texture(tex0,uv).rgb;
  FragColor = vec4(t, 1.0) * Vertex_Color;
}
Demos
GLSL Hacker demos ares available in the host_api/GLSL_Billboarding_Geometry_Shader/ folder of the code sample pack.
Some references
– Simple Introduction to Geometry Shaders in GLSL (Part1)
– Simple Introduction to Geometry Shaders in GLSL (Part2)
– Billboarding Tutorial – Cheating – Faster but not so easy
– OpenGL Transformation – ModelView
– The View Matrix
This article is also available in french.
You can find more shaders in the Shader Library.
modelview matrix ??? should’nt it be better to use the camera matrix or it’s up and left vectors