Do you know Pixel Bender? In short, it’s a plugin for image processing in Photoshop. And the cool thing with Pixel Bender is its effect library with many nice post processing filters 😉
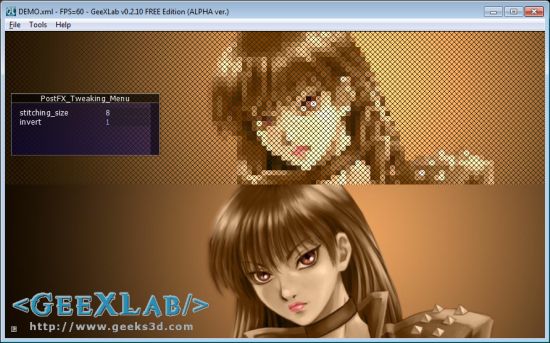
Here is an adaptation of a Pixel Bender shader (or kernel) to GeeXLab / GLSL. This post processing filter performs a cross stitching effect.
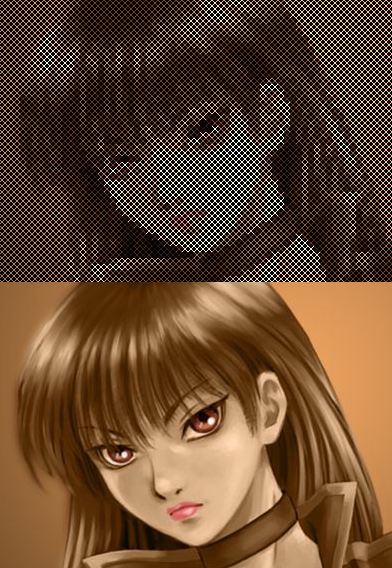
By default the effect produces this rendering:
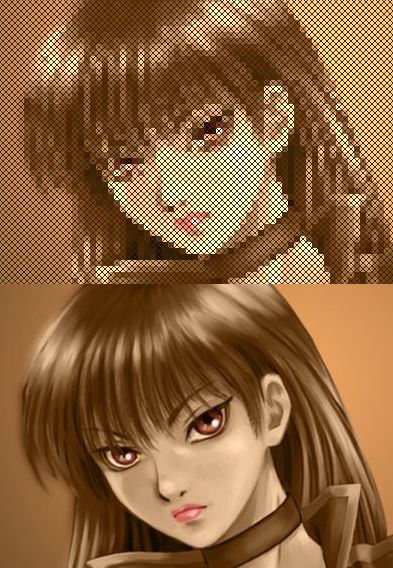
But if you change a little bit the original code you get this nice effect:
You can download the GeeXLab demo with source code here:
[download#229#image]
You need GeeXlab 0.2.10 or higher to run this demo. Start GeeXLab and load (or drag and drop) the DEMO.xml file in GeeXLab. That’s all.
Here is the complete cross-stitching GLSL shader for GeeXLab (or for another app that supports GLSL shaders):
[Vertex_Shader]
void main()
{
  gl_Position = ftransform();
  gl_TexCoord[0] = gl_MultiTexCoord0;
}

[Pixel_Shader]
uniform sampler2D tex0;
uniform float time;
uniform float rt_w;
uniform float rt_h;
uniform float stitching_size = 6.0;
uniform int invert = 0;

vec4 PostFX(sampler2D tex, vec2 uv, float time)
{
  vec4 c = vec4(0.0);
  float size = stitching_size;
  vec2 cPos = uv * vec2(rt_w, rt_h);
  vec2 tlPos = floor(cPos / vec2(size, size));
  tlPos *= size;
  int remX = int(mod(cPos.x, size));
  int remY = int(mod(cPos.y, size));
  if (remX == 0 && remY == 0)
    tlPos = cPos;
  vec2 blPos = tlPos;
  blPos.y += (size - 1.0);
  if ((remX == remY) ||
     (((int(cPos.x) - int(blPos.x)) == (int(blPos.y) - int(cPos.y)))))
  {
    if (invert == 1)
      c = vec4(0.2, 0.15, 0.05, 1.0);
    else
      c = texture2D(tex, tlPos * vec2(1.0/rt_w, 1.0/rt_h)) * 1.4;
  }
  else
  {
    if (invert == 1)
      c = texture2D(tex, tlPos * vec2(1.0/rt_w, 1.0/rt_h)) * 1.4;
    else
      c = vec4(0.0, 0.0, 0.0, 1.0);
  }
  return c;
}

void main (void)
{
  vec2 uv = gl_TexCoord[0].st;
  if (uv.y > 0.5)
  {
    gl_FragColor = PostFX(tex0, uv, time);
  }
  else
  {
    uv.y += 0.5;
    vec4 c1 = texture2D(tex0, uv);
    gl_FragColor = c1;
  }
}
Original Pixel Bender cross stitching effect can be found HERE.
More post processing shaders can be found here: Shader Library.
Background image: Ubunku
it looks cool! I didnt even know about PixelBender, thanks for remembering
I’m trying to convert this into HLSL and I’m a little confused at some of the values used.
You send over “time”, but it is never used. Was this intentional? Does it have a use?
You initialise “invert” to be 0, but then check if it is 1. I’m not familiar with GLSL, but I’m presuming you would have to send the value 1 over to the shader under certain circumstances? What would these be?
There’s probably a naming convention I’m unaware of, but what do rt_w and rt_h stand for?
@Nathan: sorry for the delay in my replay.
time uniform is not used, it’s only the result of some copy/paste operations 😉
“invert” is initialized by the Lua script in the GeeXLab demo (see the complete source code).
rt_w and rt_h are the dimensions of the render target, here the size of the demo (1024×576). Both variables are GeeXLab built-in uniforms.
I see all your shaders are full of branches. You may not be aware of it, but branching is extremely expensive in GPUs. You should consider (if you care about performance, which you may not) using mix and step for “branching”.
What would the code be if i don’t want to use rt_w and rt_h? i want to apply on whole image, not half. How can i do this, please help.